
The LiNC80 SBC1 is shipped with a 32kByte ROM chip containing the Small Computer Monitor (SCMon) by Stephen C. Cousins, including an adaptation of Grant Searle’s port of Microsoft BASIC for Nascom, as well as an adaptation of Grant Searle’s Monitor/Loader/BASIC environment (GSL). Even if SCMon and GSL both have loaders for CF-stored CP/M, the standard kit does not include all needed elements for running CP/M software. Information on how to load CP/M is provided below for those interested.
If you are building from a bare PCB, replicating the design, or want to have an extra ROM chip, you will need a copy of the standard ROM image. This is provided in Intel HEX format here: LiNC80SBC1-ROM9-SC100-GSL7-SIOB.HEX (GitHub) If you wish to rebuild from source, you may want a copy of the latest GSL-build for LiNC80 SBC1: GSL7.hex (GitHub).
Contents of this page:
Small Computer Monitor (SCMon)
SCMon is a fully featured classic machine code monitor enabling debugging of programs and general tinkering with hardware and software. It functions as the primary operating environment of the LiNC80 SBC1.
The Monitor includes a capable debugging environment with the following features:
- Boot loader to load Intel HEX files from a PC or similar
- Memory display and editing
- Register display and editing
- In-line disassembler
- In-line assembler
- Breakpoint debugging
- Single step debugging (without the need for special hardware)
SCMon is developed by and copyright to Stephen C. Cousins. His original source code and documentation is available at https://smallcomputercentral.wordpress.com/
The default console device is the second serial port (SIO B) and is usually initialized to 115200 baud, 8 data bits, 1 stop bit, no parity, hardware flow control. The other serial port (SIO A) is usually initialised to 9600 baud, 8 data bits, 1 stop bit, no parity, hardware flow control. If you wish to move the SCMon ‘s console to SIO A temporarily, issue the command “console a” (without quotes) on SIO B. When using SCMon, inter-character delays are not required.
As described in the assembly guide, to start using your LiNC80 SBC1 and SCMon, connect your adapter and cables to SIOB (TTL Serial) first, and start your terminal emulator program, configured for your USB serial port. Use 115200-8-n-1 settings. Power on your LiNC80 SBC1. You should see the sign on message

If this prompt does not appear, try pressing the hardware reset button. If the board still does not
boot, you need to start troubleshooting.
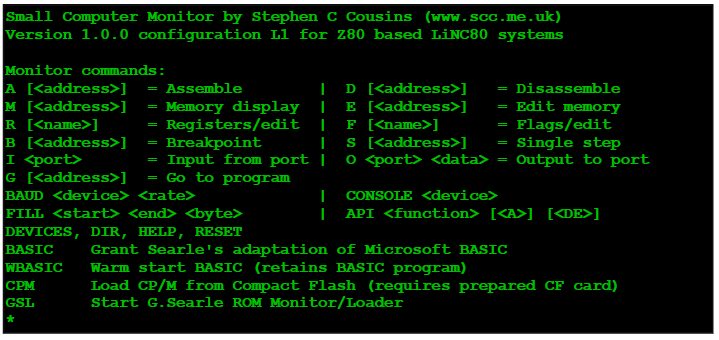
Typing ? followed by ENTER will show the monitor help text:
Starting BASIC is done by typing BASIC followed by Enter. This will cause the question «Memory top?» to appear, where you can press Enter to have BASIC automagically use the maximum available RAM (47kBytes, as 16kBytes are used as ROM, and some by SCMonitor features). To return to SCMon from BASIC, use the statements MONITOR or RESET.
Using the on-line assembler is done by entering A followed by a memory address in hexadecimal. You may then enter a new instruction mnemonic and operands which is assembled into machine code and entered into memory at the address shown. The new instruction is then displayed, followed by the next instruction and a prompt. Moving “over” a memory location without changing it is done by pressing Enter. To exit the assembler, press ESC or a period followed by Enter.
Disassembly is done by entering D followed by a memory address in hexadecimal. Paging through memory is done by repeatedly pressing Enter. To exit the disassembler, press Esc, or simply enter a new SCMon command.
Pasting in a HEX file will cause it to be loaded into memory at the locations specified in the HEX file. To execute such a file use the G<address> command. For example, a hex file containing code to be loaded at address 0x8000 can be executed by entering the command G8000 and pressing Enter.
Because SCMon is a feature rich environment, and the author has made thorough and well written documentation for it, it makes no sense to repeat more than a short introduction to the environment here. Please refer to the full user guides:
- SCMon-v1-0-userguide-e1-0-0.pdf
- SCMon-v1-0-tutorial-e1-0-0.pdf
- SCMon-v1-0-reference-e1-0-0.pdf
- SCMon-v1-0-installation-e1-0-0.pdf
The kits ship with SCMon version 1.0.0. If you have access to a ROM programmer and a compatible EE/E/OT-PROM, you may create your own build using the Small Computer Workshop. The version used to build the kit version is available here as SCWorkshop016_SCMonitor100.zip. The latest version of the monitor, workshop and documentation can be found at Steve Cousins site https://smallcomputercentral.wordpress.com/(direct link to scmon here).
Note that the CPM loader requires a prepared CF card. See below for information.
Grant Searle’s ROM Monitor/Loader (GSL)
The default ROM for the kit includes an adaptation of the ROM environment that Grant Searle developed for his CP/M on breadboard, which was a big source of inspiration for the design of LiNC80 SBC1. When used on the LiNC80 systems, this environment is referred to as GSL or Grant Searle Monitor/Loader. This software is copyright to Grant Searle, and is provided for LiNC systems with his permission. The GSL and its source code is not for commercial use, and redistribution should only be done after communication with Grant Searle.
The GSL is a simple yet robust monitor with built in BASIC loader and CP/M loader. It provides a HEX file loader feature and an execute from address feature. To use the GSL, either enter the GSL command from SCMon. Alternatively you can boot directly to GSL by moving the ROS0 J8 jumper to High (J9 if using AT28c256-series EEPROM) and pressing the Reset button.
With GSL, you can choose to use either of the serial ports. The SIO B serial port is initialized to 115200 baud, 8 data bits, 1 stop bit, no parity, hardware flow control. The other serial port (SIO A) is initialised to 9600 baud, 8 data bits, 1 stop bit, no parity, hardware flow control. If you plan to use the HEX loader feature, use a terminal emulator that lets you set inter-character delays, and set the delay to a value between 12ms and 20ms.
When starting GSL, either from SCMon, or by direct boot after moving J8, you will be presented with the prompt “Press [SPACE] to activate console” on both serial ports. Pressing space will bring you to the monitor prompt, where typing ? will show the help text.

Pressing B followed by C will cause the question «Memory top?» to appear, where you can press Enter to have BASIC automagically use the maximum available RAM (47kBytes, as 16kBytes are used as ROM). To return the monitor from BASIC, use the statement RESET (or press the Reset button).
Pasting in a HEX file will cause it to be loaded into memory at the locations specified in the HEX file. To execute such a file use the G<address> command (not listed in help text). For example, a hex file containing code to be loaded at address 0x5000 can be executed by entering the command G5000 and pressing Enter.
Note that the CPM loader requires a prepared CF card. See below for information.
The changes made to Grant Searle’s code by LiNC can be found in the GitHub repository at https://github.com/linc80/z80sbcFiles. The repository does only contain files changed from the original source, so to have a complete source code tree, the original files need to be downloaded from http://searle.x10host.com/cpm/index.html (See http://searle.wales if previous link fails)
CP/M 2 by Digital Research
CP/M was a very popular operating system created by Gary Kildall and Digital Research, Inc. Before the advent of MS-DOS version 2, CP/M was the most widely used operating system for Personal Computers and was available for most 8-bit processors of the late 70s and through the 80s, with primary support for 8080, 8085 and Z80 CPU’s. On the CP/M platform much of the standard office environment software started it’s life (except the spreadsheet which started on the AppleII). CP/M was also claimed to be the first commonly and commercially available operating system to see a commercially sold game for a PC system, in the form of Zork!
With CP/M being designed with a modular BIOS/BDOS/CCP contruction, and targeted at the Z80, we have taken advantage of the work done by Clark A. Calkins and Grant Searle to provide a native CP/M environment for the LiNC80 SBC1. As this uses the original BDOS and CCP, and runs natively on the most common CPU for CP/M, a great selection of original software can be run on your system, without modification. The operating system was made Public Domain in 2001 by the then copyright holders, Lineo, Inc
To use CP/M on the LiNC80 SBC1, a compatible Compact Flash card needs to be prepared, and an IDE-to-CF adapter is needed. Pease refer to the on-board devices page for information about connecting your adapter.
The current ROM and CP/M BIOS/BDOS is limited to use 64MB or 128MB of storage on CF. Not all CF cards can be used with the system, and the larger the card, the less likely it is that it will work. It is recommended to use a CF card of less than 2GB size, with 64MB, 128MB, 256MB and 512MB large cards recommended. For cards larger than 128MB, the remaining space after 128MB is not used.
There are three primary methods for getting CP/M and software onto your Compact Flash card. The fastest and most convenient method is to do a direct disk image transfer. The second method, which is used for creating the base for disk image transfer, is to use the SCMon compatible PutSysPlus approach. The third, provided as a legacy option, is to use the original process described by Grant Searle, but with updated Format utility and CBIOS.
For all three methods two file sets are provided, one for 64MB compact flash cards, and one for larger cards, making use of 128MB of the card space. The 64MB option is provided because of the relatively easily available second hand 64MB CF cards sourced from older Cisco networking gear. These cards have generally been compatible and reliable. The 64MB option is also useful to try if the 128MB version causes problems with your card.
Image transfer
Transferring a disk image directly onto the CF card is the fastest and most reliable way of loading CP/M for your LiNC80 SBC1. Using this method requires that you are able to connect your CF card to your host computer, using either an USB memory card reader, or a hotplug-capable IDE-CF or SATA-CF adapter.
The method involves using a direct disk write capable software. On Unix-like systems like Linux and macOS, dd or ddrescue can be used, with dd being generally available, and ddrescue being the preferred method. On Windows the Win32DiskImager is the tool of choice, available at https://sourceforge.net/projects/win32diskimager/ (the old rawrite may be used, but is not supported).
Download and decompress one of the two sized images:
If your card is 64MB in size, use the cmp64 image, if your card is larger, use the cpm128 image. Even if the image is smaller than your actual CF card size, direct write will work, but as mentioned above it will only use the first 128MB of the card, making the remaining space unavailable.
To transfer the file using Win32DiskImager, insert your CF card into your PC CF card reader, note what drive letter it is assigned, and start the program. Browse to your linc80sbc1-cpmxx.img file, and select the appropriate drive letter on the Device drop-down. Press Write to start transferring the image onto the CF card.
To transfer using dd or ddrescue, insert your CF card into your PC CF card reader, and find your that device node name the card gets assigned. Then use your dd or ddrescue command (make sure not to copy-paste commands, you HAVE to replace your device name to fit your environment):
ddrescue -D -f linc80sbc1-cpm128.img /dev/sdZ

dd if=linc80sbc1-cpm128.img of=/dev/sdZ
Once the transfer is completed, wait for all disk activity to settle before removing the card.
Your card now contains a formatted CP/M environment, complete with preloaded software. You can now move the card over to your LiNC80 SBC1 and boot to CP/M using either of the two CPM loaders.
The software preloaded on the CF card includes:
- Wordstar 4
- Turbo Pascal 3
- Microsoft Basic Compiler
- MBasic80
- DBaseII
- Microsoft Multiplan
- SuperCalc2
- Unarch/Lbrext/Uncrlzh
- VDE 266
- Download and Depkg
- Xmodem, Kermit
- Zork1, 2 and 3
- Hitchhikers Guide, Planetfall, Ladder
Format and PutSysPlus for SCMon
The PutSysPlus with SCMon approach involves Formatting your CF card using a Hex loaded Format executable on your LiNC80 SBC1, followed by transferring the CBIOS/CCP/BDOS onto the CF card using the Hex loaded PutSys executable. Start by downloading the appropriate package for either 64MB card or cards at 128MB or larger size:
Connect your LiNC80 SBC1 to your PC using the TTL Serial SIO B port, with a suitable USB-serial adapter. Use the terminal emulator of your choice, set for 115200-8-n-1 with no inter-character delay.
Connect your CF card. Boot your LiNC80 SBC1. Once the SCMon * prompt is displayed, you are ready to start the process.
Start by pasting the contents of Format_CFxxx_code8000.hex directy to the SCMonitor. This file should take just a few seconds to load. Once the file has loaded, execute it by issuing the “G 8000” command.
*G 8000
Next, load the PutSysPlus package, by pasting the contents of PutSys_LiNC80_SIO_CFxxx_code8000.hex directly to the SCMonitor prompt. Once the file has loaded, execute it by issuing the “G 8000” command.
*G 8000
Paste in the contents of SCMon_LiNC80_Download_code8000.hex to load the DOWNLOAD.COM transient program into memory, ready for SAVEing. Once the file has loaded, execute its loader by issuing the “G 8000” command.
You are now ready to boot CP/M for the first time. Simply run the SCMon command “cpm”. This should see your CF card, and load the CBIOS, CCP and BDOS from the CF card, greating you with the “A>” prompt.
Now transfer your first transient application out of memory and onto disk:
A> SAVE 2 DOWNLOAD.COM
The utility you just loaded can now be used to transfer additional software onto your system. Proceed to the section about getting software on your system using DOWNLOAD.COM and DEPKG.COM
Traditional Putsys for GSL
The Putsys for GSL approach involves Formatting your CF card using a Hex loaded Format executable on your LiNC80 SCB1, followed by transferring first the CCP/BDOS, then the CBIOS and finally the Putsys Hex loaded executable. Start by downloading the appropriate package for either 64MB card or cards at 128MB or larger size:
Connect your LiNC80 SBC1 to your PC using the TTL Serial SIO B port, with a suitable USB-serial adapter. Use the terminal emulator of your choice, set for 115200-8-n-1, with an inter-character delay of between 12ms and 20ms.
Suggested terminal software that allows for pasting of data with inter-character delay are TeraTerm, MiniCom and screen. When using screen, make use of the slowpaste setting, and the readreg/paste command combination.
To avoid a possible issue with loading the DOWNLOAD.COM transient later, set your ROM jumpers such that you boot straight to GSL on power-on (Normally J8 High J9 High, opposed to default J8 Select J9 High for SCMon).
Connect your CF card. Boot your LiNC80 SBC1. After pressing SPACE, once the > prompt is displayed, you are ready to start the process.
Start by loading in FORM128.HEX by pasting it into your terminal. The loading takes a little while, with dots echoing to show progress. Once it is fully loaded, execute it using the “G5000” command.
Next, three files need to be loaded in sequence.
- First paste in the contents of CPM22.HEX. This takes quite a while.
- When it is loaded paste in CBIOS128.HEX. This takes a little bit shorter time.
- Finally, paste in the PUTSYS.HEX file contents.
When all three files are loaded into memory, execute the PUTSYS loader by issuing the G5000 command.
Your CF card is now prepared, and you can boot CP/M for the first time. Use the menu option X followed by Y to boot CP/M. You should arrive at an “A>” prompt. Issuing the command “DIR” will reveal an empty drive.
Press Reset. Once you are back at the monitor prompt > paste in the contents of the DOWNLOAD2.HEX file. When the file has loaded, use a CBIOS jump by executing the GFFE8 command. When CP/M has booted, issue the command “SAVE 2 DOWNLOAD.COM”
The utility you just loaded can now be used to transfer additional software onto your system. Proceed to the section about getting software on your system using DOWNLOAD.COM and DEPKG.COM
Getting software on your system using DOWNLOAD.COM
When starting with a bare CF card and the Format/Putsys methods described above, your system has no files on it, not even the standard CP/M2 transient utilities. When following the guides above, you should have ended up with a single file on your A: drive, DOWNLOAD.COM. This file is a file transfer utility created by Grant Searle, to be used in combination with either his Windows Packager program, or compatible packagers (like filePackage.py).
Using DOWNLOAD.COM is sensitive to missed characters and/or loss of serial communication sync. It is therefore needed to use a serial terminal that allows for inter-character delays. The most reliable transfers are achieved with an inter-character delay of between 12ms and 20ms. Suggested terminal software that allows for pasting of data with inter-character delay are TeraTerm, MiniCom and screen. When using screen, make use of the slowpaste setting, and the readreg/paste command combination.
To use this approach, download or create the package you wish to transfer. Boot CP/M and change drive to the drive where you want the files in the package to be stored. Then simply copy and paste the contents of the .pkg file into your terminal.
For a freshly formatted and putsysed CF card, the first set of files you need, are the CP/M transient programs. These can be found at https://github.com/linc80/linc80cpmPack/blob/master/pkgfiles/CPM211Files.pkg
A core set of utilities, including the DEPKG.COM depacker, kermit and xmodem transfer utilities, lbrext/unarc/uncrlzh/uncrunch unpackers, and vt80/vt132 VT100-modesetters are all part of our LiNC Utilllities for CPM package found at https://github.com/linc80/linc80cpmPack/blob/master/pkgfiles/lincutil.pkg
Further sets of PKG formatted software can be found at
Using XMODEM and KERMIT to transfer faster
Using XModem and Kermit to transfer data with greater speed between your LiNC80 system and your host computer, requires that the programs are installed to your CF card. If you are using the pre-built disk images, these programs are on your A: drive. If you are using a manually prepared card, transfer the xmodem.pkg and kermit.pkg individually to your system using the DOWNLOAD.COM method, or transfer the large lincutils.pkg file, which contains them.
With the xmodem and kermit tools, you may choose to transfer full PKG files directly with greater speed than the DOWNLOAD.COM can provide, especially because inter-character delays are not needed. After transferring, the utility DEPKG.COM can be used to unpack the package file. This utility is available separately as depkg.pkg, or as part of the larger lincutils.pkg.
Actually documenting how to use the tools is somewhat difficult, as it depends largely on the terminal emulator used, so only a general overview is provided.
XModem requires an xmodem capable serial terminal application, and uses a single serial port. To send a file from your host to your LiNC80, use a CP/M command on the form:
a:xmodem filename.typ /R /Z5
and then start the XModem Send feature of your terminal emulator. Xmodem is supported by TeraTerm, and Minicom/picocom if lrzsz is installed.
Kermit requires Kermit installed on the host computer, and uses both SIO serial ports. As an example, information on using CKermit on Linux is provided.
Depending on how fast/slow you want your transfers to be, set the SIO clock jumpers to either CTC-clock or CPU-clock. For a fast transfer, set both jumpers to CPU clock, and use 115200-8-n-1 bitrate settings. With your Console session connected to the SIO B on the LiNC80 and ttyUSB0 on the Linux side, and your data transfer cable connected to SIO A on the LiNC80 and ttyUSB1 on the Linux side, you are ready to start. On the LiNC80, start CP/M, change to the drive you want to receive files on, and start Kermit receive:
>A:KERMIT
Kermit-80 0D:>SET PORT CRT
Kermit-80 0D:>R
On the Linux side, start kermit, configure it to use your serial port, and send your file:
user@host:~$ kermit
C-Kermit 9.0.302 OPEN SOURCE:, 20 Aug 2011, for Linux+SSL+KRB5 (64-bit)
 Copyright (C) 1985, 2011,
  Trustees of Columbia University in the City of New York.
Type ? or HELP for help.
(/home/user) C-Kermit>
(/home/user) C-Kermit>set modem type none
(/home/user) C-Kermit>set line /dev/ttyUSB1
(/home/user) C-Kermit>set carrier-watch off
(/home/user) C-Kermit>set speed 115200
(/home/user) C-Kermit>set flow rts/cts
(/home/user) C-Kermit>s filename.typ
Unlike Xmodem, a kermit session can be used to transfer multiple files without needing to specify file name on the receiving side, and without needing to issue new CP/M commands for each transfer.
Manipulating disk images using CpmTools
CpmTools is a software package for manipulating disks and disk images from CP/M under Linux and macOS. This can be used to efficiently manipulate the contents of a LiNC80 CF card image.
Start by installing cpmtools (apt-get install cpmtools, brew install cpmtools). Get the diskdefs.gscpm file, and add to your systems cpmtools diskdefs file the contents of this file: https://github.com/linc80/linc80cpmPack/blob/master/diskdefs.gscpm
Use dd or ddrescue to clone your CF card to a disk image. You can now view the contents of your disk image:
cpmls -f gscpm-a name-of-disk-image.img
The -f argument is an entry from the diskdefs file that you edited above. Your prepared CF card has defined drives A through P for 128MB-based cards, and A through H for 64MB ones. To access any particular drive, set the -f argument to gscpm-<drive>, where <drive> is the letter of the drive you want.
For more information, read the cpmtools man pages, and read through the thread at https://groups.google.com/forum/#!topic/rc2014-z80/EENSAtqFAAg